
Welcome to your first VoltAgent project! In this tutorial, we'll guide you through building a practical AI agent system that analyzes GitHub repositories. We'll fetch star counts and contributor lists, then use another agent to analyze this information. This example demonstrates the power of VoltAgent's multi-agent architecture.
Prerequisites
Before we start, make sure you have:
- Node.js installed (LTS version recommended).
- An OpenAI API key (or an API key for another supported LLM provider).
Step 1: Create Your VoltAgent Project
First, let's set up a new VoltAgent project. We'll use the create-voltagent-app CLI for a quick start. Open your terminal and run:
npm create voltagent-app@latest github-repo-analyzer
Follow the prompts:
- Select your preferred package manager (npm, yarn, or pnpm).
Once the setup is complete, navigate into your new project directory:
cd github-repo-analyzer
And create a .env file in the root of the project to store your API key:
OPENAI_API_KEY=sk-proj-
Replace sk-proj- with your actual OpenAI API key.
Step 2: Understanding the Goal
Our goal is to create an agent system that takes a GitHub repository URL (like https://github.com/voltagent/voltagent or simply voltagent/voltagent) and provides an analysis based on its star count and contributors.
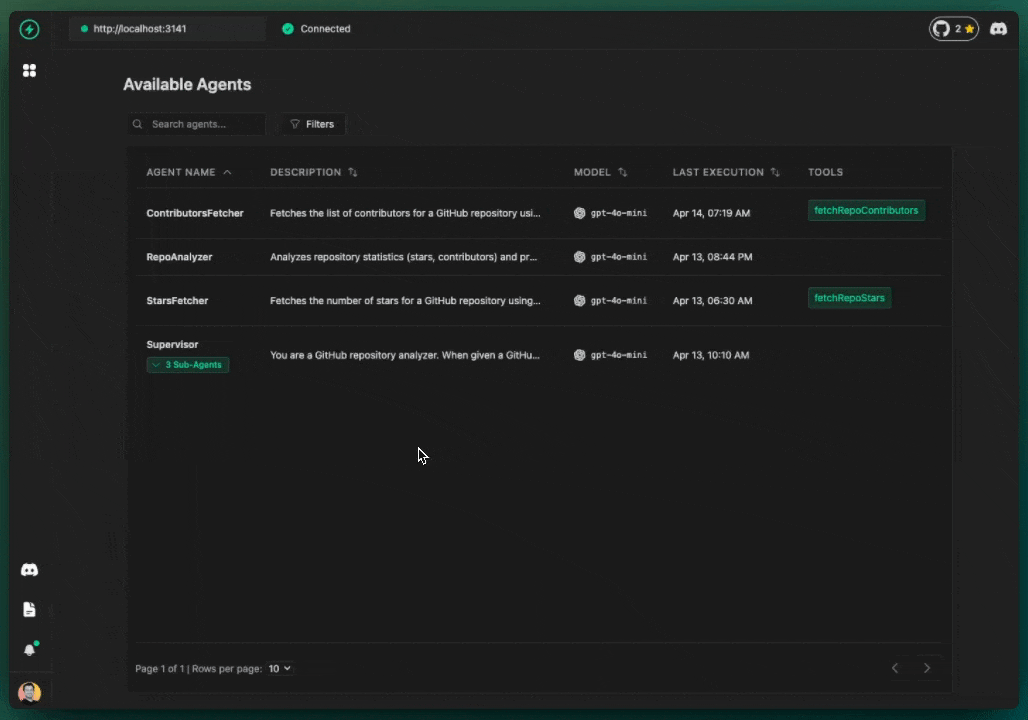
To achieve this, we'll use a supervisor-worker pattern:
- Supervisor Agent: Takes the user's input (the repo URL) and coordinates the work.
- Stars Fetcher Agent: Fetches the star count for the repo.
- Contributors Fetcher Agent: Fetches the list of contributors for the repo.
- Analyzer Agent: Takes the star count and contributor list and generates insights.
Step 3: Setting Up the Tools (Conceptual)
Agents often need tools to interact with the outside world (like APIs). In a real application, you would define tools to fetch data from the GitHub API. For this tutorial, imagine we have two pre-built tools:
fetchRepoStarsTool: A tool that takes a repository name (e.g.,voltagent/core) and returns the number of stars.fetchRepoContributorsTool: A tool that takes a repository name and returns a list of contributors.
(To learn how to create your own tools, check out the Tool Creation documentation.)
Let's assume these tools are defined in a separate file, perhaps src/tools.ts. We'll import them into our main agent file.
Step 4: Defining the Agents
Now, let's define our agents in src/index.ts. Open this file and replace its contents with the following code:
import { VoltAgent, Agent } from "@voltagent/core";
import { VercelAIProvider } from "@voltagent/vercel-ai";
import { openai } from "@ai-sdk/openai";

// Assume these tools are defined elsewhere (e.g., src/tools.ts)
// import { fetchRepoContributorsTool, fetchRepoStarsTool } from "./tools";

// --- Mock Tools for Demonstration ---
// In a real scenario, you'd use actual tool implementations.
// We use simple functions here to illustrate agent structure.
const mockFetchRepoStarsTool = {
  name: "fetchRepoStars",
  description: "Fetches the star count for a given GitHub repository (owner/repo).",
  parameters: {
    type: "object",
    properties: {
      repo: { type: "string", description: 'Repository name (e.g., "voltagent/core")' },
    },
    required: ["repo"],
  },
  execute: async ({ repo }: { repo: string }) => ({ stars: Math.floor(Math.random() * 5000) }), // Mock data
};

const mockFetchRepoContributorsTool = {
  name: "fetchRepoContributors",
  description: "Fetches the contributors for a given GitHub repository (owner/repo).",
  parameters: {
    type: "object",
    properties: {
      repo: { type: "string", description: 'Repository name (e.g., "voltagent/core")' },
    },
    required: ["repo"],
  },
  execute: async ({ repo }: { repo: string }) => ({ contributors: ["UserA", "UserB", "UserC"] }), // Mock data
};
// --- End Mock Tools ---

// 1. Create the stars fetcher agent
const starsFetcherAgent = new Agent({
  name: "StarsFetcher",
  instructions: "Fetches the number of stars for a GitHub repository using a tool.",
  llm: new VercelAIProvider(),
  model: openai("gpt-4o-mini"),
  tools: [mockFetchRepoStarsTool], // Use the mock tool
});

// 2. Create the contributors fetcher agent
const contributorsFetcherAgent = new Agent({
  name: "ContributorsFetcher",
  instructions: "Fetches the list of contributors for a GitHub repository using a tool.",
  llm: new VercelAIProvider(),
  model: openai("gpt-4o-mini"),
  tools: [mockFetchRepoContributorsTool], // Use the mock tool
});

// 3. Create the analyzer agent (no tools needed)
const analyzerAgent = new Agent({
  name: "RepoAnalyzer",
  instructions: "Analyzes repository statistics (stars, contributors) and provides insights.",
  llm: new VercelAIProvider(),
  model: openai("gpt-4o-mini"),
  // This agent doesn't need tools; it processes data provided by the supervisor.
});

// 4. Create the supervisor agent that coordinates all the sub-agents
const supervisorAgent = new Agent({
  name: "Supervisor",
  instructions: `You are a GitHub repository analyzer. When given a GitHub repository URL or owner/repo format, you will:
1. Extract the owner/repo name.
2. Use the StarsFetcher agent to get the repository's star count.
3. Use the ContributorsFetcher agent to get the repository's contributors.
4. Pass the collected data (stars, contributors) to the RepoAnalyzer agent.
5. Return the analysis provided by the RepoAnalyzer.

Example input: https://github.com/vercel/ai-sdk or vercel/ai-sdk
`,
  llm: new VercelAIProvider(),
  model: openai("gpt-4o-mini"),
  subAgents: [starsFetcherAgent, contributorsFetcherAgent, analyzerAgent], // Assign sub-agents
});

// 5. Initialize the VoltAgent with the agent hierarchy
new VoltAgent({
  agents: {
    // We only expose the supervisor externally.
    // The supervisor will internally call the other agents.
    supervisor: supervisorAgent,
  },
});

console.log("GitHub Repo Analyzer Agent system started.");
Explanation:
- Imports: We import necessary components from VoltAgent and AI SDK libraries.
- Mock Tools: For simplicity, we've added mock versions of the tools directly in this file. In a real app, you'd import actual tool implementations.
starsFetcherAgent: Defined with a name, description, LLM configuration, and themockFetchRepoStarsTool. Its job is solely to use this tool when asked.contributorsFetcherAgent: Similar to the stars fetcher, but configured with themockFetchRepoContributorsTool.analyzerAgent: This agent doesn't need tools. Its purpose is to receive data (stars and contributors) and use its LLM capabilities to generate an analysis based on its description.supervisorAgent: This is the main coordinator.- Its
descriptionclearly outlines the steps it needs to take. - Crucially, it includes the other three agents in its
subAgentsarray. This tells the supervisor it can delegate tasks to these specific agents.
- Its
new VoltAgent(...): This initializes the VoltAgent system. We register thesupervisorAgentunder the keysupervisor. This means when we interact with our application, we'll be talking directly to the supervisor.
Step 5: Run Your Agent System
Now, let's run the agent. Go back to your terminal (make sure you're in the github-repo-analyzer directory) and run the development command:
- npm
- yarn
- pnpm
npm run dev
yarn dev
pnpm dev
You should see the VoltAgent server startup message:
══════════════════════════════════════════════════
  VOLTAGENT SERVER STARTED SUCCESSFULLY
══════════════════════════════════════════════════
  ✓ HTTP Server: http://localhost:3141

  Test your agents with VoltOps Console: https://console.voltagent.dev
══════════════════════════════════════════════════
Step 6: Interact with Your Agent
- Open the Console: Go to
https://console.voltagent.dev. - Find Your Agent: Look for the agent named
supervisor(or whatever name you gave it in thenew VoltAgentcall). - Open Agent Details: Click on the
supervisoragent. - Start Chatting: Click the chat icon.
- Send a Message: Try sending a message like:
Analyze the repo voltagent/voltagentorTell me about https://github.com/voltagent/voltagent
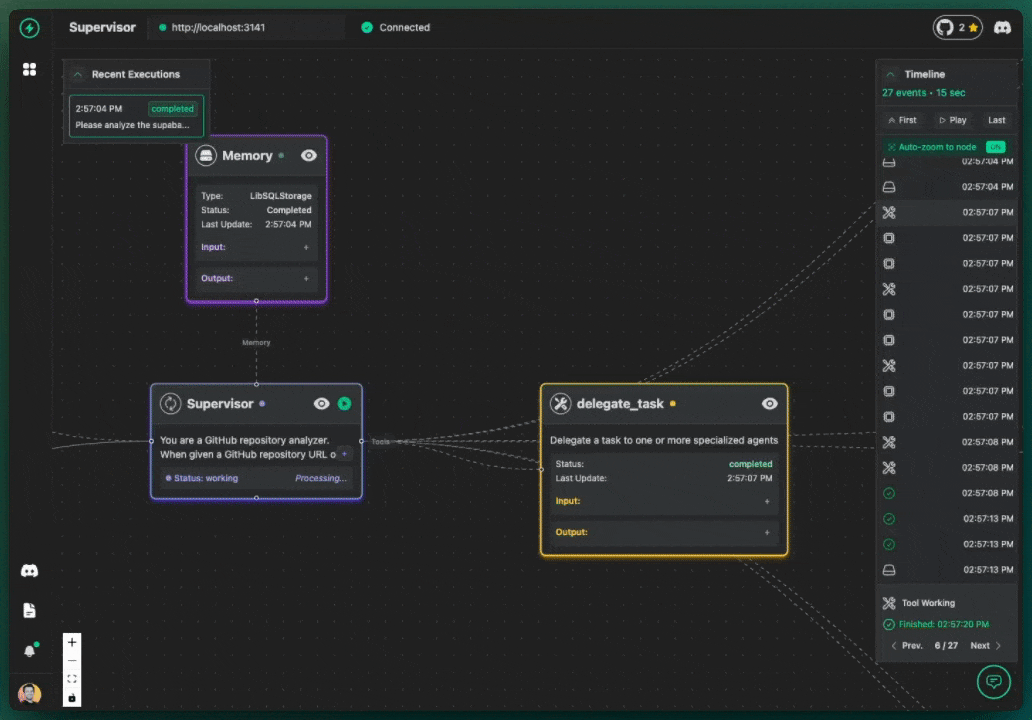
The supervisor agent will now follow its instructions:
- It will likely first call the
StarsFetcherto get the (mock) star count. - Then, it will call the
ContributorsFetcherfor the (mock) contributor list. - Finally, it will pass this information to the
RepoAnalyzerand return the analysis to you in the chat.
You can observe this multi-step process happening in the VoltAgent VoltOps Platform!
Conclusion
Congratulations! You've successfully built a multi-agent system using VoltAgent. You learned how to:
- Set up a VoltAgent project.
- Define multiple agents with specific roles and tools (even mock ones).
- Create a supervisor agent to orchestrate tasks among sub-agents.
- Run and interact with your agent system via the VoltOps Platform.
This example showcases how you can break down complex tasks into smaller, manageable units, each handled by a specialized agent.
Next Steps
- Replace the mock tools with real implementations using the GitHub API.
- Try the full example: Check out the complete GitHub Repo Analyzer example with real tool implementations. You can also create a project directly from this example:
npm create voltagent-app@latest -- --example github-repo-analyzer - Explore different LLM providers and models.
- Learn more about Agent Memory to give your agents context.
- Dive deeper into Tool Creation.
Happy building!