API Overview
The VoltAgent Core API provides a programmatic interface to manage and interact with your VoltAgents. It allows you to list agents, generate text or structured object responses, manage agent history, check for updates, and more.
The API is built using Hono, a fast and lightweight web framework for Node.js and other JavaScript runtimes.
Getting Started
The Core API server is typically started as part of your application when you initialize VoltAgent. By default, it tries to run on port 3141
, but may use other ports (like 4310, 1337) if the default is unavailable. Check your console output when starting your application to see the exact URL.
# Example console output
$ node your-app.js
══════════════════════════════════════════════════
VOLTAGENT SERVER STARTED SUCCESSFULLY
══════════════════════════════════════════════════
✓ HTTP Server: http://localhost:3141
✓ Swagger UI: http://localhost:3141/ui
VoltOps Platform: https://console.voltagent.dev
══════════════════════════════════════════════════
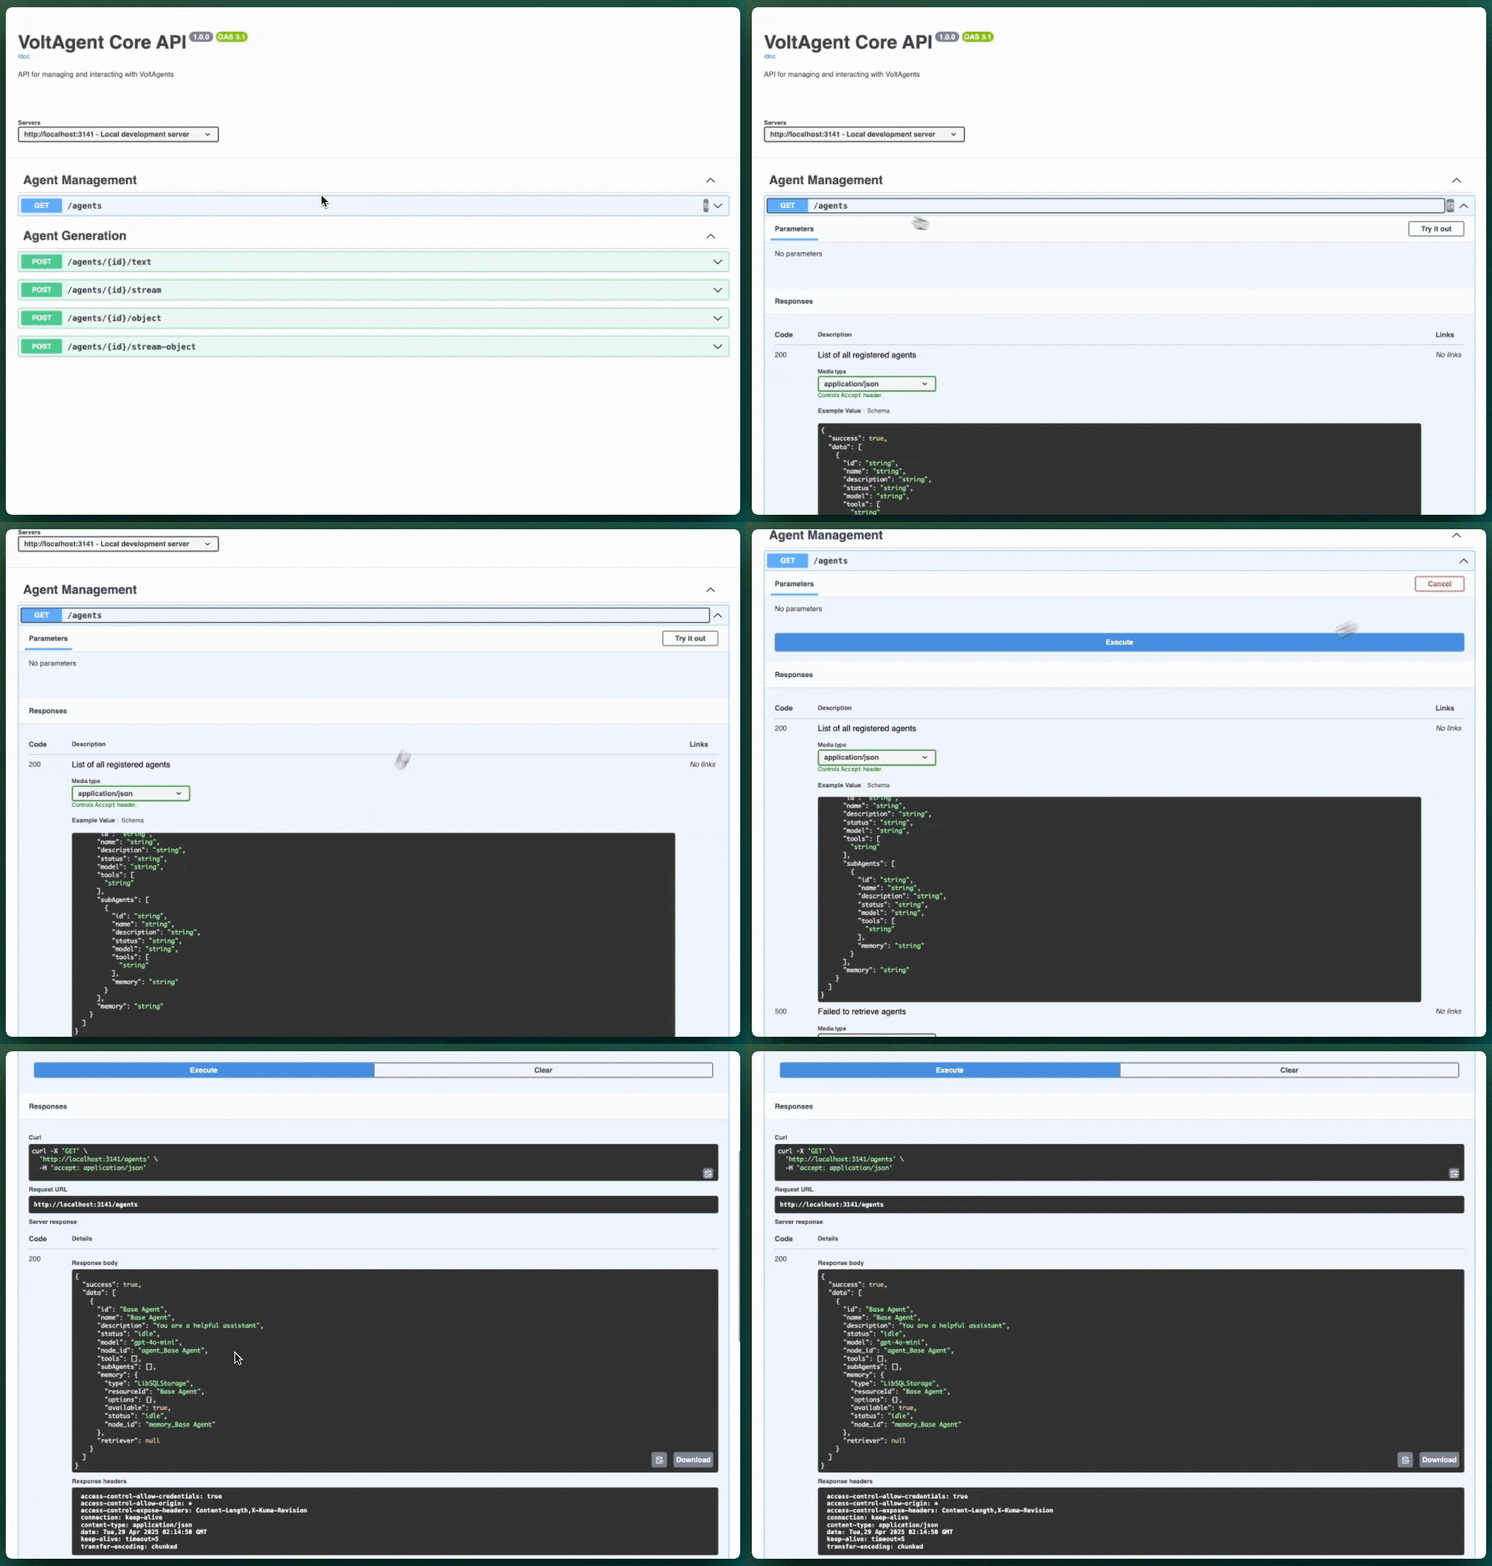
Interactive API Documentation (Swagger UI)
To make exploring and interacting with the API easier, we provide interactive documentation using Swagger UI.
- Access: Navigate to
/ui
on your running API server (e.g.,http://localhost:3141/ui
). - Features:
- Lists all available API endpoints grouped by tags (e.g., "Agent Generation", "Agent Management").
- Shows details for each endpoint: HTTP method, path, parameters, request body structure, and possible responses.
- Provides example values and schemas.
- Allows you to execute API calls directly from your browser ("Try it out" button) and see the results.
This is the recommended way to explore the API's capabilities.
Links to the Swagger UI (/ui
) is also conveniently available on the API server's root page (/
) and printed in the console logs when the server starts.
Swagger UI Configuration
You can control the availability of Swagger UI using the enableSwaggerUI
option in your VoltAgent configuration:
import { Agent, VoltAgent } from "@voltagent/core";
import { VercelAIProvider } from "@voltagent/vercel-ai";
import { openai } from "@ai-sdk/openai";
const agent = new Agent({
name: "My Assistant",
instructions: "A helpful assistant",
llm: new VercelAIProvider(),
model: openai("gpt-4o-mini"),
});
new VoltAgent({
agents: { agent },
server: {
enableSwaggerUI: true, // default true in development, false in production
},
});
Default Behavior:
- Development (
NODE_ENV !== 'production'
): Swagger UI is enabled - Production (
NODE_ENV === 'production'
): Swagger UI is disabled
Override Examples:
// Force enable in production
new VoltAgent({
agents: { agent },
server: {
enableSwaggerUI: true, // Always enabled, even in production
},
});
// Force disable in development
new VoltAgent({
agents: { agent },
server: {
enableSwaggerUI: false, // Always disabled, even in development
},
});
Common Generation Options
When using the generation endpoints (/text
, /stream
, /object
, /stream-object
), you can provide an options
object in the request body to customize the generation process. All options are optional.
Option | Description | Type | Default |
---|---|---|---|
userId | Optional user ID for context tracking. | string | - |
conversationId | Optional conversation ID for context tracking. | string | - |
contextLimit | Optional limit for conversation history context. | number (integer) | 10 |
maxSteps | Maximum number of iteration steps for this request (overrides agent's maxSteps). | number (integer) | - |
temperature | Controls randomness (0-1). Lower is more deterministic. | number | 0.7 |
maxTokens | Maximum number of tokens to generate in the response. | number (integer) | 4000 |
topP | Controls diversity via nucleus sampling (0-1). | number | 1.0 |
frequencyPenalty | Penalizes repeated tokens (0-2). Higher values decrease repetition. | number | 0.0 |
presencePenalty | Penalizes tokens based on presence (0-2). Higher values encourage new topics. | number | 0.0 |
seed | Optional integer seed for reproducible results. | number (integer) | - |
stopSequences | An array of strings that will stop generation if encountered. | array of string | - |
extraOptions | A key-value object for provider-specific options. | object | - |
userContext | A key-value object for dynamic agent context (roles, tiers, etc.). | object | - |
Understanding maxSteps
The maxSteps
parameter controls the number of iteration steps an agent can take during a single operation. This is particularly important for agents that use tools or coordinate with sub-agents, as they may require multiple LLM interactions to complete a task.
When to Use maxSteps:
- Tool-using Agents: Agents that make API calls, database queries, or other tool executions may need multiple steps to complete complex tasks
- Multi-agent Workflows: Supervisor agents coordinating sub-agents need step limits to prevent runaway execution
- Resource Control: Limit computational costs and execution time for expensive operations
Step Examples:
{
"input": "Research the latest AI trends and write a summary",
"options": {
"maxSteps": 8,
"temperature": 0.7
}
}
This might result in:
- Agent analyzes the request
- Agent uses research tool to gather data
- Agent processes research results
- Agent uses writing tool to draft content
- Agent reviews and refines the output
- Agent finalizes the response
Priority Order:
- API request
maxSteps
option (highest priority) - Agent-level
maxSteps
configuration - Default calculation (10 × number of sub-agents, minimum 10)
For Sub-agent Workflows: The maxSteps
limit applies to the entire workflow. All sub-agents inherit and share the same step budget, preventing infinite delegation loops.
Abort Signal Support
VoltAgent Core API now supports graceful operation cancellation using the standard Web API AbortSignal
. This enables clients to cancel expensive operations when users navigate away or manually stop requests.
Client-Side Cancellation
Use the standard AbortController
to cancel requests:
// Create AbortController
const abortController = new AbortController();
// Cancel when user navigates away
window.addEventListener("beforeunload", () => abortController.abort());
// Stream request with abort signal
const response = await fetch("http://localhost:3141/agents/my-agent/stream", {
method: "POST",
headers: { "Content-Type": "application/json" },
body: JSON.stringify({
input: "Write a very long story...",
options: { maxTokens: 4000 },
}),
signal: abortController.signal, // ✅ Automatic cancellation
});
// Manual cancellation after timeout
setTimeout(() => abortController.abort(), 10000);
Supported Endpoints
All generation endpoints support abort signals:
/text
- Non-streaming text generation/stream
- Streaming text generation/object
- Non-streaming object generation/stream-object
- Streaming object generation
Cancellation Behavior
When a request is cancelled:
- Server-side: Agent operations stop gracefully and resources are cleaned up
- Non-streaming: HTTP request terminates with standard abort behavior
- Streaming: SSE stream closes and no further events are sent
- SubAgents: Cancellation propagates through sub-agent hierarchies
Error Handling with Abort
For abort-related errors, see the Error Handling section below for details on how cancellation is reported.
OpenAPI Specification
For developers needing the raw API specification for code generation or other tooling, the OpenAPI 3.1 specification is available in JSON format.
- Access: Navigate to
/doc
on your running API server (e.g.,http://localhost:3141/doc
).
Key Endpoints (via Swagger UI)
While the Swagger UI (/ui
) provides the most comprehensive details, here's a brief overview of the main functionalities documented:
GET /agents
: Lists all agents currently registered with theAgentRegistry
.POST /agents/{id}/text
: Generates a plain text response from the specified agent based on the input prompt and options.POST /agents/{id}/stream
: Streams a text response chunk by chunk using Server-Sent Events (SSE).POST /agents/{id}/object
: Generates a structured JSON object response from the agent, guided by a provided schema.POST /agents/{id}/stream-object
: Streams parts of a structured JSON object response using SSE.POST /workflows/{id}/execute
: Executes a workflow with the provided input data and returns the result.- (Other endpoints): Explore
/ui
for details on history, tool execution, update checks, etc.
Please note that while the API documentation for /object
and /stream-object
specifies that the schema
parameter should be a standard JSON Schema object, the current backend implementation (Agent.generateObject
, Agent.streamObject
) still expects a Zod schema instance.
Custom REST Endpoints
VoltAgent allows you to register custom REST API endpoints alongside the built-in agent endpoints. This feature enables you to extend your API server with custom business logic, data endpoints, or integration points.
Overview
Custom endpoints are regular REST API routes that you can define with:
- Path: URL pattern (with optional parameters)
- HTTP Method: GET, POST, PUT, PATCH, DELETE, OPTIONS
- Handler: Function that processes requests and returns responses
- Description: Optional documentation string
All custom endpoints are automatically displayed in the server startup banner and are included in your API server alongside the core VoltAgent endpoints.
Server Configuration
VoltAgent uses a unified server
object to configure all server-related options including custom endpoints, Swagger UI, port, and auto-start behavior:
new VoltAgent({
agents: { myAgent },
server: {
autoStart: true, // default true
port: 3000, // default 3141
enableSwaggerUI: true, // default true in development, false in production
customEndpoints: [
// Custom API endpoints
{
path: "/api/health",
method: "get" as const,
handler: async (c) => c.json({ status: "healthy" }),
description: "Health check endpoint",
},
],
},
});
Registration Methods
You can register custom endpoints using two different methods:
- Function Call Registration
- Constructor Registration
Use registerCustomEndpoints()
for programmatic registration, conditional logic, or when you need to register endpoints before creating the VoltAgent instance.
import { registerCustomEndpoints } from "@voltagent/core";
const endpoints = [
{
path: "/api/health",
method: "get" as const,
handler: async (c) => {
return c.json({
success: true,
data: { status: "healthy", timestamp: new Date().toISOString() },
});
},
description: "Health check endpoint",
},
];
// Register before creating VoltAgent
registerCustomEndpoints(endpoints);
// Then create your VoltAgent instance
new VoltAgent({ agents: { myAgent } });
Best for:
- Conditional endpoint registration
- Registering endpoints before VoltAgent creation
- Multiple registration calls
- Dynamic endpoint configuration
Pass endpoints directly to the VoltAgent constructor - the most convenient method for most use cases.
new VoltAgent({
agents: { myAgent },
server: {
customEndpoints: [
{
path: "/api/users/:id",
method: "get" as const,
handler: async (c) => {
const userId = c.req.param("id");
return c.json({
success: true,
data: { id: userId, name: "John Doe" },
});
},
description: "Get user by ID",
},
],
},
});
Best for:
- Simple, static endpoint registration
- Most common use cases
- Clean, declarative configuration
- Single registration point
The legacy customEndpoints
option (directly on VoltAgent constructor) is still supported but deprecated:
// ❌ Deprecated (but still works)
new VoltAgent({
agents: { myAgent },
customEndpoints: endpoints, // @deprecated
});
// ✅ Recommended
new VoltAgent({
agents: { myAgent },
server: {
customEndpoints: endpoints,
},
});
Using Both Methods
Both methods work together! You can use them simultaneously and all endpoints will be properly registered.
// Function Call: Register some endpoints via function
registerCustomEndpoints(authEndpoints);
// Constructor: Register others via constructor
new VoltAgent({
agents: { myAgent },
server: {
customEndpoints: dataEndpoints,
},
});
// Result: Both authEndpoints and dataEndpoints are registered
Endpoint Definition Structure
Each custom endpoint follows this TypeScript interface:
interface CustomEndpointDefinition {
path: string; // Must start with "/"
method: HttpMethod; // "get" | "post" | "put" | "patch" | "delete" | "options"
handler: Function; // Request handler function
description?: string; // Optional description for documentation
}
Path Patterns
Custom endpoints support various path patterns:
const endpoints = [
// Static paths
{ path: "/api/health", method: "get", handler: healthHandler },
// Path parameters
{ path: "/api/users/:id", method: "get", handler: getUserHandler },
{ path: "/api/posts/:postId/comments/:commentId", method: "get", handler: getCommentHandler },
// Nested paths
{ path: "/api/v1/admin/users", method: "post", handler: createUserHandler },
// File-like paths
{ path: "/api/files/:filename", method: "get", handler: getFileHandler },
];
Handler Functions
Handler functions receive a Hono context object with request/response utilities:
const endpoints = [
// GET endpoint
{
path: "/api/users/:id",
method: "get" as const,
handler: async (c) => {
const userId = c.req.param("id");
const user = await getUserById(userId);
if (!user) {
return c.json({ success: false, error: "User not found" }, 404);
}
return c.json({ success: true, data: user });
},
},
// POST endpoint with JSON body
{
path: "/api/users",
method: "post" as const,
handler: async (c) => {
try {
const body = await c.req.json();
const { name, email } = body;
const newUser = await createUser({ name, email });
return c.json({ success: true, data: newUser }, 201);
} catch (error) {
return c.json(
{
success: false,
error: "Invalid request body",
},
400
);
}
},
},
// Query parameters
{
path: "/api/search",
method: "get" as const,
handler: async (c) => {
const query = c.req.query("q");
const limit = parseInt(c.req.query("limit") || "10");
const results = await searchData(query, limit);
return c.json({ success: true, data: results });
},
},
];
Request/Response Utilities
The handler context provides these utilities:
handler: async (c) => {
// Path parameters
const id = c.req.param("id");
// Query parameters
const page = c.req.query("page");
const filters = c.req.queries("filter"); // Array for multiple values
// Request body
const jsonData = await c.req.json();
const formData = await c.req.formData();
const textData = await c.req.text();
// Headers
const authHeader = c.req.header("authorization");
// JSON response
return c.json({ data: "response" });
// Text response
return c.text("Hello World");
// HTML response
return c.html("<h1>Hello</h1>");
// Custom response
return c.body("Custom content", {
status: 201,
headers: { "Content-Type": "text/plain" },
});
// Redirect
return c.redirect("/new-url");
};
Workflow Endpoints
VoltAgent provides a comprehensive set of REST API endpoints for managing and executing workflows. These endpoints allow you to list workflows, execute them, and control their execution state (suspend/resume).
List All Workflows
GET /workflows
Returns a list of all registered workflows in the system.
Response:
{
"success": true,
"data": [
{
"id": "order-approval",
"name": "Order Approval Workflow",
"purpose": "Process and approve customer orders",
"stepsCount": 5,
"status": "idle"
},
{
"id": "user-verification",
"name": "User Verification",
"purpose": "Verify new user accounts",
"stepsCount": 3,
"status": "idle"
}
]
}
cURL Example:
curl http://localhost:3141/workflows
Execute Workflow
POST /workflows/{id}/execute
Executes a workflow with the provided input data. The workflow runs to completion or until it suspends.
Request Body:
{
"input": any, // Workflow-specific input data
"options": {
"userId": "string", // Optional: User ID for tracking
"conversationId": "string", // Optional: Conversation ID
"userContext": {} // Optional: Custom context data
}
}
Response (Completed):
{
"success": true,
"data": {
"executionId": "exec_1234567890_abc123",
"startAt": "2024-01-15T10:00:00.000Z",
"endAt": "2024-01-15T10:00:05.123Z",
"status": "completed",
"result": {
// Workflow-specific output
}
}
}
Response (Suspended):
{
"success": true,
"data": {
"executionId": "exec_1234567890_abc123",
"startAt": "2024-01-15T10:00:00.000Z",
"endAt": null,
"status": "suspended",
"result": null,
"suspension": {
"suspendedAt": "2024-01-15T10:00:02.500Z",
"reason": "Waiting for manager approval",
"suspendedStepIndex": 2
}
}
}
Example:
curl -X POST http://localhost:3141/workflows/order-approval/execute \
-H "Content-Type: application/json" \
-d '{
"input": {
"orderId": "order-123",
"amount": 5000,
"customerEmail": "[email protected]"
},
"options": {
"userId": "user-456"
}
}'
Stream Workflow Execution
POST /workflows/{id}/stream
Execute a workflow and receive real-time events via Server-Sent Events (SSE). This endpoint is perfect for monitoring workflow execution progress in real-time.
The REST API currently does not support continuous streaming across suspend/resume cycles:
- Initial execution: Streamed via SSE in real-time ✅
- When suspended: Stream closes with a suspension event ⚠️
- Resume operation: Returns complete result (not streamed) ⚠️
Coming Soon: WebSocket-based continuous streaming is being considered for future releases. If you need this feature, please open an issue with your use case.
Request Body:
{
"input": any, // Workflow input data (validated against workflow's input schema)
"options": {
"userId": "string", // Optional: User ID for context
"conversationId": "string", // Optional: Conversation ID
"executionId": "string", // Optional: Custom execution ID
"userContext": object // Optional: Additional context
}
}
Response: Server-Sent Events stream
Each event is formatted as:
data: {"type":"event-type","executionId":"...","from":"...","status":"...","timestamp":"..."}\n\n
Event Types:
workflow-start
- Workflow execution startedstep-start
- Step execution startedstep-complete
- Step completed successfullyworkflow-suspended
- Workflow suspended (stream closes after this)workflow-complete
- Workflow completed successfullyworkflow-error
- Workflow encountered an errorworkflow-result
- Final execution result
Complete Example with Suspend/Resume:
async function executeWorkflowWithStreaming() {
const workflowId = "expense-approval";
let executionId = null;
// Phase 1: Stream initial execution
console.log("Starting workflow stream...");
const response = await fetch(`/workflows/${workflowId}/stream`, {
method: "POST",
headers: { "Content-Type": "application/json" },
body: JSON.stringify({
input: {
employeeId: "emp-123",
amount: 5000,
category: "travel",
description: "Conference trip",
},
}),
});
// Process SSE events
const reader = response.body.getReader();
const decoder = new TextDecoder();
let buffer = "";
while (true) {
const { done, value } = await reader.read();
if (done) break;
buffer += decoder.decode(value, { stream: true });
const lines = buffer.split("\n");
buffer = lines.pop() || "";
for (const line of lines) {
if (line.startsWith("data: ")) {
const event = JSON.parse(line.slice(6));
console.log(`[${event.type}] ${event.from || ""}`);
if (event.executionId) {
executionId = event.executionId;
}
// Stream closes on suspension
if (event.type === "workflow-suspended") {
console.log("Workflow suspended, stream closed");
console.log("Suspension reason:", event.metadata?.reason);
}
}
}
}
// Phase 2: Resume via standard endpoint (not streamed)
if (executionId) {
console.log("Approving expense...");
const resumeResponse = await fetch(
`/workflows/${workflowId}/executions/${executionId}/resume`,
{
method: "POST",
headers: { "Content-Type": "application/json" },
body: JSON.stringify({
resumeData: {
approved: true,
managerId: "mgr-456",
comments: "Approved for business travel",
},
}),
}
);
const result = await resumeResponse.json();
console.log("Resume completed:", result);
// Note: Resume returns complete result, not streamed events
}
}
Current Architecture Benefits:
- Stateless: Each request is independent, no server state required
- Scalable: Works seamlessly with load balancers and horizontal scaling
- Simple: Clear separation between streaming (monitoring) and execution (business logic)
- Reliable: Server restarts don't affect resumed executions
Future Enhancement: We're exploring WebSocket-based continuous streaming to maintain connections across suspend/resume cycles. Help us prioritize this feature by sharing your use case on GitHub.
Suspend Running Workflow
POST /workflows/{id}/executions/{executionId}/suspend
Suspends a currently running workflow execution. This is useful for pausing long-running workflows or when external intervention is needed.
Request Body:
{
"reason": "string" // Optional: Reason for suspension
}
Response:
{
"success": true,
"data": {
"executionId": "exec_1234567890_abc123",
"status": "suspended",
"suspension": {
"suspendedAt": "2024-01-15T10:30:45.123Z",
"reason": "User clicked pause button"
}
}
}
Error Responses:
404
: Workflow execution not found400
: Cannot suspend workflow in current state (e.g., already completed or suspended)
Example:
curl -X POST http://localhost:3141/workflows/data-processing/executions/exec_1234567890_abc123/suspend \
-H "Content-Type: application/json" \
-d '{"reason": "System maintenance required"}'
Resume Suspended Workflow
POST /workflows/{id}/executions/{executionId}/resume
Resumes a suspended workflow execution. You can provide data to the suspended step and optionally specify which step to resume from.
Request Body:
{
"resumeData": any, // Optional: Data to pass to the resumed step
"options": {
"stepId": "string" // Optional: Specific step ID to resume from
}
}
Response:
{
"success": true,
"data": {
"executionId": "exec_1234567890_abc123",
"startAt": "2024-01-15T10:00:00.000Z",
"endAt": "2024-01-15T10:35:20.456Z",
"status": "completed",
"result": {
// Final workflow output
}
}
}
Error Responses:
404
: Workflow execution not found or not in suspended state400
: Invalid resume data (fails schema validation)
Examples:
Simple resume:
curl -X POST http://localhost:3141/workflows/order-approval/executions/exec_1234567890_abc123/resume \
-H "Content-Type: application/json" \
-d '{
"resumeData": {
"approved": true,
"approvedBy": "[email protected]"
}
}'
Resume from specific step:
curl -X POST http://localhost:3141/workflows/multi-step/executions/exec_9876543210_xyz789/resume \
-H "Content-Type: application/json" \
-d '{
"resumeData": {
"retryWithNewData": true
},
"options": {
"stepId": "step-3"
}
}'
Complete Workflow Management Example
Here's a complete example showing the full lifecycle of workflow execution via REST API:
const API_BASE = "http://localhost:3141";
class WorkflowClient {
// List available workflows
async listWorkflows() {
const response = await fetch(`${API_BASE}/workflows`);
const result = await response.json();
return result.data;
}
// Execute a workflow
async executeWorkflow(workflowId, input, options = {}) {
const response = await fetch(`${API_BASE}/workflows/${workflowId}/execute`, {
method: "POST",
headers: { "Content-Type": "application/json" },
body: JSON.stringify({ input, options }),
});
const result = await response.json();
if (!result.success) {
throw new Error(result.error);
}
return result.data;
}
// Suspend a running workflow
async suspendWorkflow(workflowId, executionId, reason) {
const response = await fetch(
`${API_BASE}/workflows/${workflowId}/executions/${executionId}/suspend`,
{
method: "POST",
headers: { "Content-Type": "application/json" },
body: JSON.stringify({ reason }),
}
);
const result = await response.json();
if (!result.success) {
throw new Error(result.error);
}
return result.data;
}
// Resume a suspended workflow
async resumeWorkflow(workflowId, executionId, resumeData, stepId) {
const body = { resumeData };
if (stepId) {
body.options = { stepId };
}
const response = await fetch(
`${API_BASE}/workflows/${workflowId}/executions/${executionId}/resume`,
{
method: "POST",
headers: { "Content-Type": "application/json" },
body: JSON.stringify(body),
}
);
const result = await response.json();
if (!result.success) {
throw new Error(result.error);
}
return result.data;
}
}
// Usage example
async function handleOrderApproval() {
const client = new WorkflowClient();
try {
// 1. Start the workflow
console.log("Starting order approval workflow...");
const execution = await client.executeWorkflow(
"order-approval",
{
orderId: "order-789",
amount: 15000,
customerType: "premium",
},
{
userId: "user-123",
userContext: { department: "sales" },
}
);
console.log("Execution ID:", execution.executionId);
// 2. Check if workflow is suspended
if (execution.status === "suspended") {
console.log("Workflow suspended:", execution.suspension.reason);
// 3. Simulate manager approval after 5 seconds
setTimeout(async () => {
console.log("Manager approved the order");
const result = await client.resumeWorkflow("order-approval", execution.executionId, {
approved: true,
managerId: "mgr-456",
comments: "Approved for VIP customer",
});
console.log("Final result:", result);
}, 5000);
} else {
console.log("Workflow completed immediately:", execution.result);
}
} catch (error) {
console.error("Workflow error:", error.message);
}
}
// Run the example
handleOrderApproval();
Workflow Status Values
Workflows can have the following status values:
idle
: Workflow is registered but not currently executingrunning
: Workflow is actively executingsuspended
: Workflow is paused and waiting for resumecompleted
: Workflow finished successfullyerror
: Workflow terminated with an error
Best Practices
- Always save the executionId: You'll need it for suspend/resume operations
- Handle suspended status: Check if a workflow suspended after execution
- Validate resume data: Ensure resume data matches the workflow's schema
- Use meaningful suspension reasons: This helps with debugging and UI display
- Implement proper error handling: Handle 404s and 400s appropriately
- Consider timeout scenarios: Suspended workflows might expire based on your business logic
Authentication
Currently, the Core API does not implement built-in authentication routes. Ensure that your API server is deployed in a secure environment or protected by appropriate network-level security (e.g., firewall rules, reverse proxy authentication) if exposing it outside your local machine.
Error Handling
The VoltAgent Core API provides comprehensive error handling for both regular HTTP endpoints and streaming endpoints.
Regular Endpoints (Non-Streaming)
For regular endpoints like /text
and /object
, errors are returned as standard HTTP responses:
{
"success": false,
"error": "Error message describing what went wrong"
}
Common HTTP status codes:
404
: Agent not found500
: Internal server error (e.g., invalid schema, agent processing error)- Request cancelled: When using
AbortSignal
, the request will be cancelled according to standard fetch abort behavior
Passing User Context for Dynamic Agents
For dynamic agents that adapt their behavior based on user context, you can pass a userContext
object in the request options. This allows agents to dynamically adjust their instructions, models, and tools based on user roles, subscription tiers, languages, or any other contextual information.
User Context Format
The userContext
should be a flat key-value object where keys are strings and values can be any JSON-serializable data:
{
"input": "Help me with my account",
"options": {
"userContext": {
"role": "premium_user",
"language": "Spanish",
"tier": "pro",
"userId": "user-123",
"company": "TechCorp"
},
"temperature": 0.7,
"maxTokens": 500
}
}
Example API Calls with User Context
Text Generation with User Context:
curl -X POST http://localhost:3141/agents/dynamic-agent/text \
-H "Content-Type: application/json" \
-d '{
"input": "I need help with system administration",
"options": {
"userContext": {
"role": "admin",
"language": "English",
"tier": "enterprise"
},
"temperature": 0.8
}
}'
Streaming with User Context:
curl -N -X POST http://localhost:3141/agents/dynamic-agent/stream \
-H "Content-Type: application/json" \
-d '{
"input": "What are my available options?",
"options": {
"userContext": {
"role": "customer",
"language": "French",
"tier": "basic"
}
}
}'
Object Generation with User Context:
curl -X POST http://localhost:3141/agents/dynamic-agent/object \
-H "Content-Type: application/json" \
-d '{
"input": "Extract user information from: John is a premium admin from TechCorp",
"schema": {
"type": "object",
"properties": {
"name": {"type": "string"},
"role": {"type": "string"},
"tier": {"type": "string"}
}
},
"options": {
"userContext": {
"extractionMode": "detailed",
"language": "English"
}
}
}'
The dynamic agent will receive this context and adapt its behavior accordingly - using different instructions, models, or tools based on the provided context values.
Streaming Endpoints (SSE)
For streaming endpoints like /stream
and /stream-object
, errors are delivered as Server-Sent Events within the stream itself. This allows real-time error reporting during long-running operations.
Error Event Format
When an error occurs during streaming, you'll receive an SSE event with type: "error"
:
data: {
"type": "error",
"error": "Error message describing what went wrong",
"code": "ERROR_CODE",
"timestamp": "2024-01-15T10:30:45.123Z"
}
Error Types and Codes
Error Code | Description | When it occurs |
---|---|---|
SETUP_ERROR | Error during initial setup | Agent initialization or configuration issues |
STREAM_ERROR | Generic streaming error | LLM provider errors, network issues, invalid API keys |
ITERATION_ERROR | Error during stream processing | Issues while processing stream chunks |
USER_CANCELLED | Operation cancelled by user | When AbortSignal is triggered by client |
Streaming Event Flow
A typical successful stream contains these event types:
text
orobject
events (data chunks)completion
event (stream finished successfully)
A stream with errors will contain:
text
orobject
events (if any data was processed)error
event (when error occurs)- Stream closes after error event
Example Error Scenarios
Invalid API Key:
data: {
"type": "error",
"error": "Incorrect API key provided: sk-proj-...",
"code": "STREAM_ERROR",
"timestamp": "2024-01-15T10:30:45.123Z"
}
Schema Validation Error (Object Streaming):
data: {
"type": "error",
"error": "Schema validation failed: Expected string, received number",
"code": "STREAM_ERROR",
"timestamp": "2024-01-15T10:30:45.123Z"
}
Handling Errors in Client Code
JavaScript/TypeScript Example:
// Fetch-based SSE streaming (supports POST with request body)
const streamUrl = "/agents/your-agent-id/stream";
const response = await fetch(streamUrl, {
method: "POST",
headers: {
"Content-Type": "application/json",
},
body: JSON.stringify({
input: "Tell me a joke!",
options: { temperature: 0.7, maxTokens: 100 },
}),
});
if (!response.ok) {
throw new Error(`Stream request failed: ${response.status}`);
}
const reader = response.body.getReader();
const decoder = new TextDecoder();
let buffer = "";
while (true) {
const { done, value } = await reader.read();
if (done) break;
buffer += decoder.decode(value, { stream: true });
const lines = buffer.split("\n\n");
buffer = lines.pop() || "";
for (const line of lines) {
if (line.startsWith("data: ")) {
try {
const data = JSON.parse(line.substring(6));
switch (data.type) {
case "text":
// Handle text chunk
console.log("Text:", data.text);
break;
case "object":
// Handle object chunk
console.log("Object:", data.object);
break;
case "error":
// Handle error
console.error("Stream error:", data.error);
console.error("Error code:", data.code);
return; // Exit on error
case "completion":
// Handle completion
console.log("Stream completed successfully");
return;
}
} catch (error) {
console.error("Error parsing SSE data:", error);
}
}
}
}
cURL Example (Streaming with Error):
# This will show error events in the stream if API key is invalid
curl -N -X POST http://localhost:3141/agents/your-agent-id/stream \
-H "Content-Type: application/json" \
-d '{ "input": "Hello!", "options": { "temperature": 0.7 } }'
# Example output with error:
# data: {"type":"error","error":"Incorrect API key provided","code":"STREAM_ERROR","timestamp":"2024-01-15T10:30:45.123Z"}
Basic Example (Using cURL)
You can quickly test the API using curl
. Below are examples for key endpoints. You can optionally include userId
and conversationId
in the options
object for context tracking, as shown in the second example for each generation endpoint.
List all agents:
curl http://localhost:3141/agents
Generate text (Basic):
curl -X POST http://localhost:3141/agents/your-agent-id/text \
-H "Content-Type: application/json" \
-d '{ "input": "Tell me a joke!" }'
Generate text (With Options):
curl -X POST http://localhost:3141/agents/your-agent-id/text \
-H "Content-Type: application/json" \
-d '{ "input": "Tell me a joke!", "options": { "userId": "user-123", "conversationId": "your-unique-conversation-id" } }'
Generate text (With maxSteps Control):
curl -X POST http://localhost:3141/agents/your-agent-id/text \
-H "Content-Type: application/json" \
-d '{ "input": "Use tools to research and analyze this topic", "options": { "maxSteps": 5, "temperature": 0.7 } }'
Stream text (Basic):
# Note: SSE streams are continuous. This command will keep the connection open.
curl -N -X POST http://localhost:3141/agents/your-agent-id/stream \
-H "Content-Type: application/json" \
-d '{ "input": "Tell me a joke!" }'
Stream text (With Options):
# Note: SSE streams are continuous. This command will keep the connection open.
curl -N -X POST http://localhost:3141/agents/your-agent-id/stream \
-H "Content-Type: application/json" \
-d '{ "input": "Tell me a joke!", "options": { "userId": "user-123", "conversationId": "your-unique-conversation-id" } }'
Stream text (With maxSteps Control for Complex Workflows):
# Example for agents with tools or sub-agents - limits iteration steps
curl -N -X POST http://localhost:3141/agents/supervisor-agent-id/stream \
-H "Content-Type: application/json" \
-d '{ "input": "Coordinate research and writing workflow", "options": { "maxSteps": 15, "temperature": 0.8 } }'
Generate object (Basic - requires a Zod schema JSON representation, see warning above):
# Replace '{"type":"object", ...}' with the JSON representation of your Zod schema
curl -X POST http://localhost:3141/agents/your-agent-id/object \
-H "Content-Type: application/json" \
-d '{ "input": "Extract the name and age from: John Doe is 30 years old.", "schema": {"type":"object", "properties": {"name": {"type": "string"}, "age": {"type": "number"}}, "required": ["name", "age"]} }'
Generate object (With Options - requires a Zod schema JSON representation, see warning above):
# Replace '{"type":"object", ...}' with the JSON representation of your Zod schema
curl -X POST http://localhost:3141/agents/your-agent-id/object \
-H "Content-Type: application/json" \
-d '{ "input": "Extract the name and age from: John Doe is 30 years old.", "schema": {"type":"object", "properties": {"name": {"type": "string"}, "age": {"type": "number"}}, "required": ["name", "age"]}, "options": { "userId": "user-123", "conversationId": "your-unique-conversation-id" } }'
Stream object parts (Basic - requires a Zod schema JSON representation, see warning above):
# Note: SSE streams are continuous.
# Replace '{"type":"object", ...}' with the JSON representation of your Zod schema
curl -N -X POST http://localhost:3141/agents/your-agent-id/stream-object \
-H "Content-Type: application/json" \
-d '{ "input": "Generate user profile: Name: Alice, City: Wonderland", "schema": {"type":"object", "properties": {"name": {"type": "string"}, "city": {"type": "string"}}, "required": ["name", "city"]} }'
Stream object parts (With Options - requires a Zod schema JSON representation, see warning above):
# Note: SSE streams are continuous.
# Replace '{"type":"object", ...}' with the JSON representation of your Zod schema
curl -N -X POST http://localhost:3141/agents/your-agent-id/stream-object \
-H "Content-Type: application/json" \
-d '{ "input": "Generate user profile: Name: Alice, City: Wonderland", "schema": {"type":"object", "properties": {"name": {"type": "string"}, "city": {"type": "string"}}, "required": ["name", "city"]}, "options": { "userId": "user-123", "conversationId": "your-unique-conversation-id" } }'
Execute workflow:
curl -X POST http://localhost:3141/workflows/order-approval/execute \
-H "Content-Type: application/json" \
-d '{
"input": {
"orderId": "order-123",
"amount": 5000,
"items": ["laptop", "mouse", "keyboard"]
},
"options": {
"userId": "user-456",
"conversationId": "conv-789"
}
}'
# Response:
# {
# "success": true,
# "data": {
# "executionId": "exec_1234567890_abc123",
# "startAt": "2024-01-15T10:00:00.000Z",
# "endAt": "2024-01-15T10:00:05.123Z",
# "status": "completed",
# "result": {
# "approved": true,
# "processedBy": "system"
# }
# }
# }
Abort Signal Examples
JavaScript with Abort Signal:
// Create abort controller
const abortController = new AbortController();
// Cancel after 5 seconds
setTimeout(() => abortController.abort(), 5000);
// Stream with cancellation support
try {
const response = await fetch("http://localhost:3141/agents/your-agent-id/stream", {
method: "POST",
headers: { "Content-Type": "application/json" },
body: JSON.stringify({
input: "Write a very long story...",
options: { maxTokens: 4000 },
}),
signal: abortController.signal,
});
// Process stream...
const reader = response.body.getReader();
// ... stream processing code ...
} catch (error) {
if (error.name === "AbortError") {
console.log("Request was cancelled");
}
}
cURL with timeout (simulating cancellation):
# Cancel stream after 3 seconds using timeout
timeout 3s curl -N -X POST http://localhost:3141/agents/your-agent-id/stream \
-H "Content-Type: application/json" \
-d '{ "input": "Write a very long story...", "options": { "maxTokens": 4000 } }'
(Replace your-agent-id
with the actual ID of one of your agents)
Explore the Swagger UI at /ui
for detailed information on all endpoints, parameters, and schemas!